
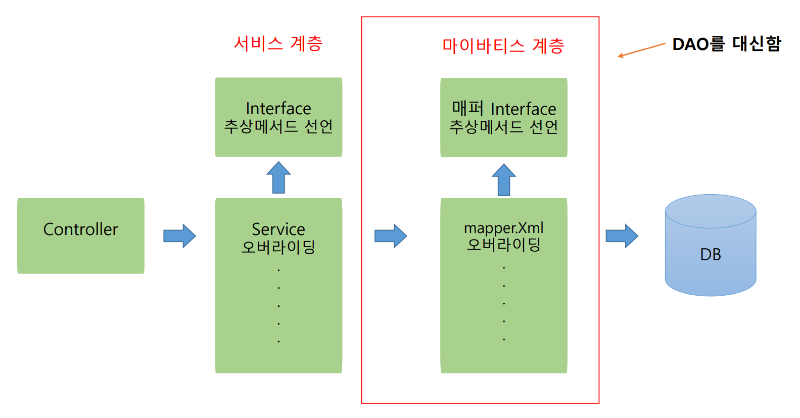
MyBatis란?
- MyBatis 는 개발자가 지정한 SQL, 고급 매핑을 지원하는 프레임워크이다.
- MyBatis 는 JDBC 코드와 수동으로 셋팅하는 파라미터와 결과 매핑을 제거한다.
- MyBatis 는 복잡한 JDBC코드를 걷어내며 깔끔한 소스코드를 유지한다.
-MyBatis 는 DAO계층을 대신한다.
-MyBatis 는 기존 DAO의 Interface의 구현클래스를 xml파일이 대신한다.
-스프링에서 사용하려면 MyBatis-Spring module을 다운로드 받아야 한다
- MyBatis는 기존 DAO계층을 대신한다.
기존 JDBC프로그램과 MyBatis의 차이점

MyBatis의 사용방법
MyBatis는 SpringFramework에서 제공하는게 아니라 모듈을 추가해야한다.
(Mybatis Module & MyBatis-Spring Module) 버전은 올린년도로 비교해서 호환성을 대충 맞춰준다.
pom.xml에 MVNRepository.com에서 가져온 코드 추가 후 MavenUpdate
	<!-- MyBatis 마이바티스 설정 -->
	<!-- https://mvnrepository.com/artifact/org.mybatis/mybatis -->
	<dependency>
		<groupId>org.mybatis</groupId>
		<artifactId>mybatis</artifactId>
		<version>3.5.6</version>
	</dependency>

	<!-- https://mvnrepository.com/artifact/org.mybatis/mybatis-spring -->
	<dependency>
		<groupId>org.mybatis</groupId>
		<artifactId>mybatis-spring</artifactId>
		<version>2.0.6</version>
	</dependency>
MyBatis사용시 기본적으로 Spring-JDBC라이브러리가 필요하다.
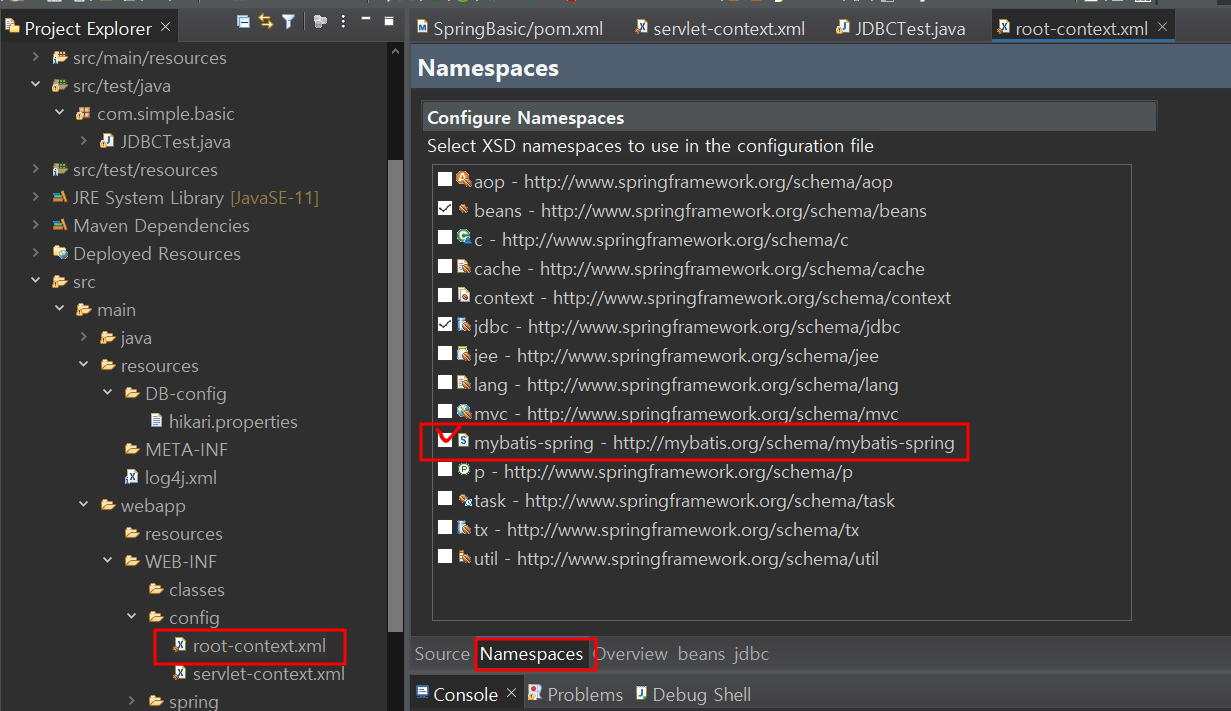
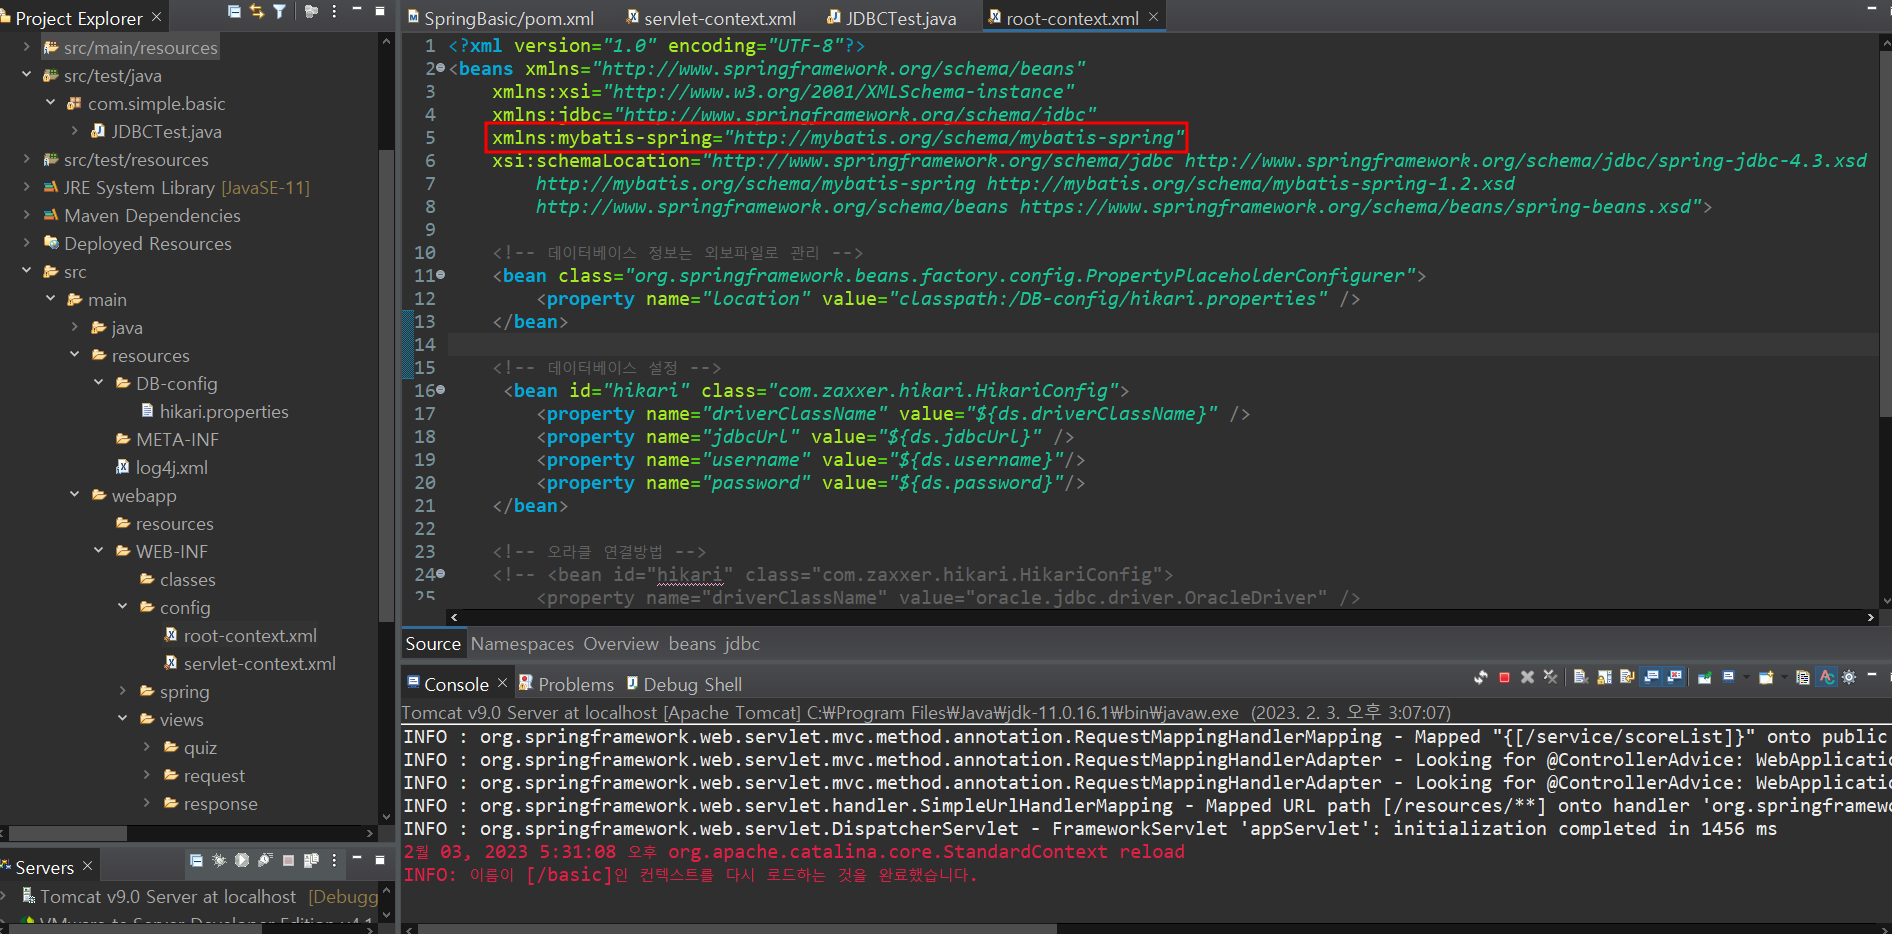
1. root-context.xml에서 namespaces에 있는 myBatis 활성화
2. 활성화 된건지 확인 (root-context의 beans에 xmlns:mybatis-spring="http://mybatis.org/schema/mybatis-spring"확인)
3. SqlSessionFactory 빈 생성
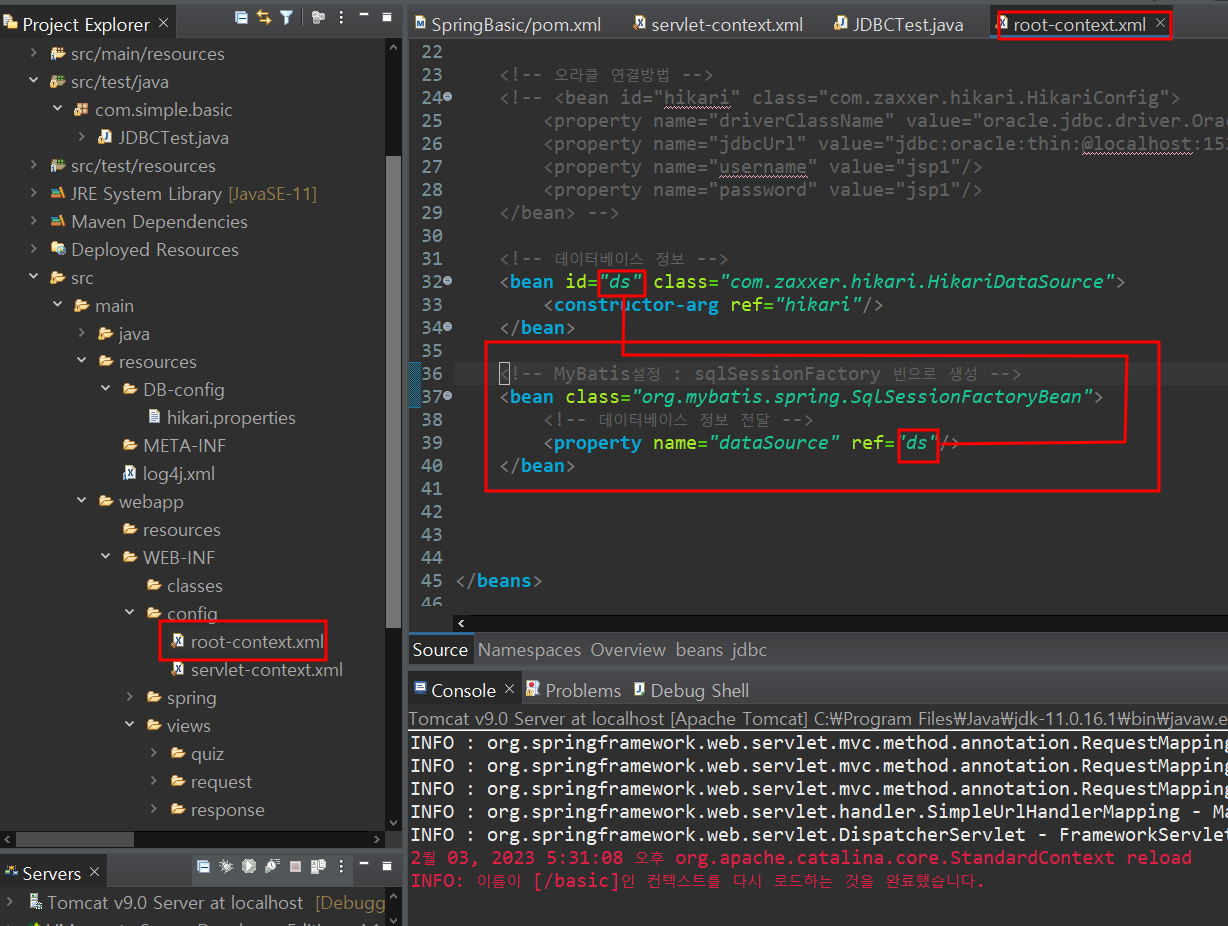
MyBatis의 경우 interface와 xml파일은 반드시 이름이 동일해야 한다

테스트 진행
잘 작동하는지 확인하기위해서 테스트를 진행해봤다.
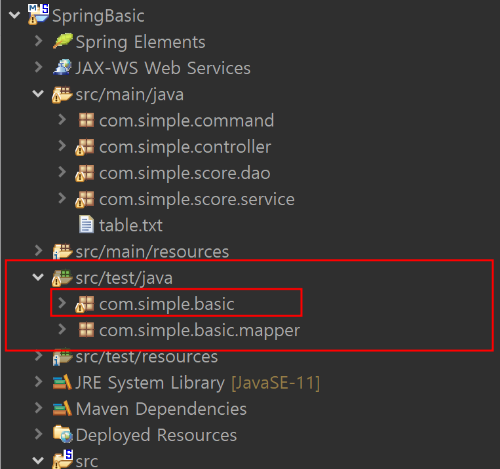
-src/test/java폴더에 com.simple.basic.mapper패키지를 생성했다.

- MyBatis의 경우 interface와 xml파일은 반드시 이름이 동일해야 한다

com.simple.basic.mapper패키지안에 TestMapper 인터페이스 생성 및 사용할 메서드 생성
public interface TestMapper {
	public String getTime();
}
동일한 이름의 xml파일생성
<?xml version="1.0" encoding="UTF-8"?>
<!DOCTYPE mapper
  PUBLIC "-//mybatis.org//DTD Mapper 3.0//EN"
  "http://mybatis.org/dtd/mybatis-3-mapper.dtd">

<!-- 인터페이스의 풀경로를 적음 -->
<mapper namespace="com.simple.basic.mapper.TestMapper">
	<!-- id는 인터페이스의 메서드명 resultType = 반환타입 -->
	<select id="getTime" resultType="String">
		select now()
	</select>
</mapper>
basic폴더에 테스트용 메서드를 호출할 class생성 (JDBCMybatis로 만듬)
클래스에 @RunWith(SpringJUnit4ClassRunner.class) (JUnit으로 테스트환경을 구성하는 용도) 추가
@ContextConfiguration(동작시킬 Spring 설정파일경로) 추가
//JUnit으로 테스트환경을 구성
@RunWith(SpringJUnit4ClassRunner.class)
//동작시킬 Spring 설정파일
@ContextConfiguration("file:src/main/webapp/WEB-INF/config/root-context.xml")
public class JDBCMybatis {

}
테스트할 메서드 생성 전 필요한 객체들 호출
	//root-context의 (id가 ds인 hikariDataSource를 연결해둔) sqlSessionFactory Bean 호출
	@Autowired
	SqlSessionFactoryBean sqlSessionFactory;

	//xml파일 연결
	@Autowired
	TestMapper testMapper;
메서드 생성
@Test//테스트코드로 실행함
	public void testCode01() {
		//마이바티스 핵심 객체
		System.out.println(sqlSessionFactory);
	}

	//xml파일의 getTime메서드 호츨(TestMapper.xml의 id가 getTime인 select태그 호출)
	@Test//테스트코드로 실행함
	public void testCode02() {
		String time = testMapper.getTime();
		System.out.println(time);
	}
결과
sqlSessionFactory 와 TestMapper.xml에서 작성한 쿼리문( select now() )이 동작하는걸 확인할 수 있다.

MYBatis Mapper Xml의 속성
마이바티스에서의 쿼리문
Mybatis를 사용할때 xml에서 만드는 태그명은 query문의 시작부분이다.
-Select
- Insert
- Update
- Delete
ex)
<!-- id는 인터페이스의 메서드명 resultType = 반환타입 -->
	<select id="getTime" resultType="String">
		select now()
	</select>
MapperTag
| Namespace | 인턴페이스 전체경로 작성 ( 인터페이스 동일한 이름으로 병함해서 처리함 ) |
Select 속성
| Id | 메서드를 찾기위한 구분자 ( 인터페이스의 메서드명과 동일 ) |
| parameterType | 생략가능// 구문에 전달된 파라미터 타입 ( 패키지경로 포함, 전체 클래스명 ) |
| resultType | 결과 반환타입 ( 패키지경로포함, 전체 클래스명 ) |
| resultMap | 외부 Map타입을 이용한 반환타입 ( Join할때 사용함) |
Insert, Update, Delete
| Id | 메서드를 찾기위한 구분자 ( 인터페이스의 메서드명과 동일 ) |
| parameterType | 생략가능// 구문에 전달된 파라미터 타입 ( 패키지경로 포함, 전체 클래스명 ) |
Sql 구문의 값을 전달
| 기존의 pstmt의 ? 를 #{name}으로 대체한다 |
부등호 같은 문자열로 인식시키는 방법
<![CDATA[
코드
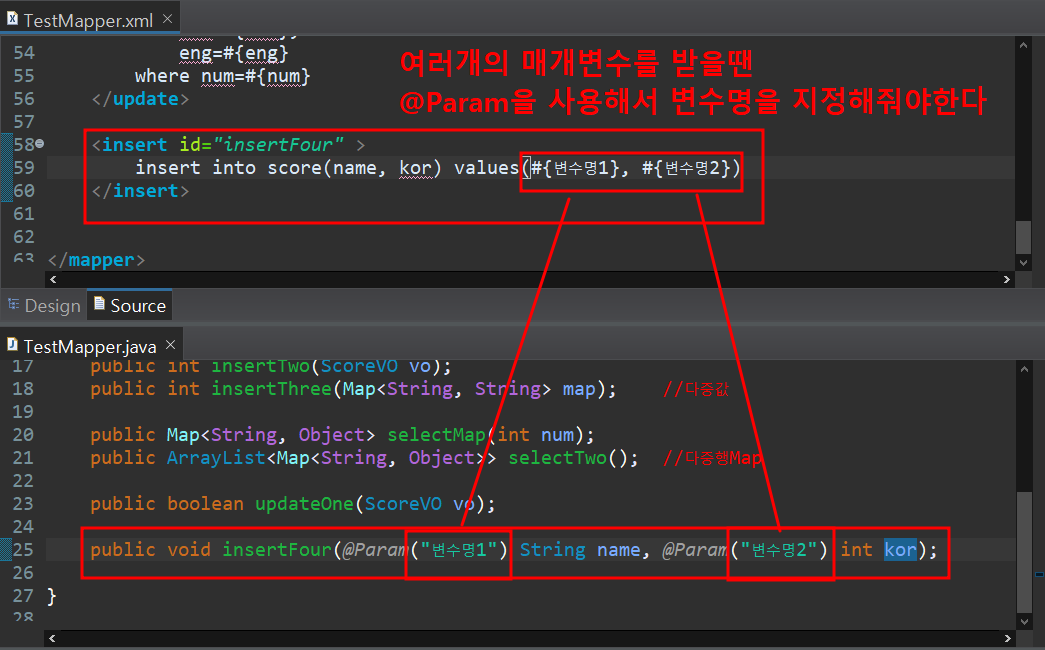
]]>마이바티스의 두개이상 데이터 맵핑 처리 (중요)
- VO클래스 자동맵핑
- HashMap 자동맵핑 (지양한다)
- @Param이름지정을 사용해서 맵핑
동적쿼리 지원
- if
- chose(when, otherwise)
- foreach
쿼리문을 만들때 여러개의 매개변수를 받는법
SELECT 구문 사용법
- list에 select의 리턴값 여러개 넣기
interface에서 정의
public ArrayList<ScoreVO> getScore();xml에서
<!-- ;는 작성하지 않는다 -->
<!-- 한행에 대한 처리를 할 데이터 타입 -->
<select id="getScore" resultType="com.simple.command.ScoreVO">
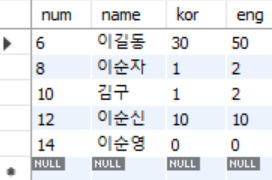
select * from score
</select>테스트할 코드
//select 태그의 ResultType
	@Test
	public void testCode03() {
		ArrayList<ScoreVO> list = testMapper.getScore();
		System.out.println(list.toString());
	}
- 매개변수를 가지고 조회(select)하는 경우
1. 인터페이스에 메서드 생성
public ScoreVO getOne(int a);2. mapper xml에 쿼리문 작성
<!-- 매개변수 - 단일값(interface에서 지정한 매개변수명 그대로 들어감) -->
	<select id="getOne" resultType="com.simple.command.ScoreVO">
		select * from score where num = #{a}
	</select>
3. 클래스에서 메서드 실행
@Test
	public void testCode04() {
		ScoreVO vo = testMapper.getOne(10);
		System.out.println(vo.toString());
	}
주의할점 : 매개변수는 그대로 가져온다

결과값

- Select - Map타입의 반환 (MAP을 통한 select는 부득이한 경우에만 사용함)
1. Mapper 인터페이스에 메서드 생성
public Map<String, Object> selectMap(int num);2. Mapper XML에 구문생성
	<select id="selectMap" resultType="map" parameterType="int">
		select * from score where num=#{num}
	</select>
3. Class에서 호출 + 실행
//select - map타입의 반환
	@Test
	public void testCode08() {
		Map<String, Object> map =  testMapper.selectMap(6);
		System.out.println(map.toString());
	}
결과

- Select - Map을 통한 다중행 조회 (MAP을 통한 select는 부득이한 경우에만 사용함)
1. Mapper 인터페이스에 메서드 생성
public ArrayList<Map<String, Object>> selectTwo(); //다중행Map2. Mapper XML에 구문생성
	<select id="selectTwo" resultType="map">
		select * from score
	</select>
3. Class에서 호출 + 실행
//select - map을 통한 다중행 조회
	@Test
	public void testCode09() {
		ArrayList<Map<String, Object>> list = testMapper.selectTwo();
		System.out.println(list.toString());
	}
결과

Insert구문 사용법
- 단일 매개변수 Insert구문
Mapper 인터페이스에 메서드 생성
public int insertOne(String name);Mapper XML에 구문생성
<!-- parameterType - 매개변수의 타입 (생략가능함)  -->
	<insert id="insertOne" parameterType="String" >
		insert into score(name) values(#{name})
	</insert>
Class에서 호출 + 실행
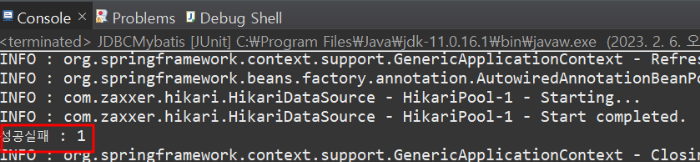
//insert -단일값
	@Test
	public void testCode05() {
		int result = testMapper.insertOne("이순영");
		System.out.println("성공실패 : "+  result);
	}
결과 =>

- 다중 매개변수 Insert구문(VO)
Mapper 인터페이스에 메서드 생성
-vo를 사용해서 한번에 값을 다 집어넣음
public int insertTwo(ScoreVO vo);Mapper XML에 구문생성
<insert id="insertTwo" parameterType="com.simple.command.ScoreVO">
		insert into score(name, kor, eng)
		values(#{name}, #{kor}, #{eng})
	</insert>
Class에서 호출 + 실행
//insert-다중값(Setter명)
	@Test
	public void testCode06() {
		ScoreVO vo = new ScoreVO(0, "테스트", "50", "100");

		int result = testMapper.insertTwo(vo);
		System.out.println("성공실패 : "+  result);
	}
결과 =>

- 다중 매개변수 Insert구문(MAP)
Mapper 인터페이스에 메서드 생성 (map를 사용해서 값을 받아서 넣을 예정)
public int insertThree(Map<String, String> map); //다중값Mapper XML에 구문생성
	<insert id="insertThree">
		insert into score(name, kor, eng)
		values(#{name}, #{kor}, #{eng})
	</insert>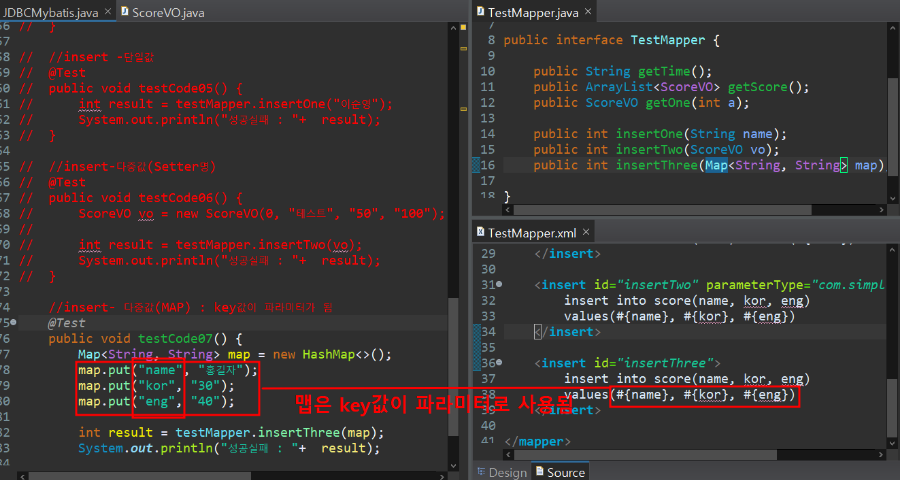
Class에서 호출 + 실행
//insert- 다중값(MAP) : key값이 파라미터가 됨
	@Test
	public void testCode07() {
		Map<String, String> map = new HashMap<>();
		map.put("name", "홍길자");
		map.put("kor", "30");
		map.put("eng", "40");

		int result = testMapper.insertThree(map);
		System.out.println("성공실패 : "+  result);
	}
결과 =>

Update구문 사용법
- Update 구문
1. Mapper 인터페이스에 메서드 생성
public boolean updateOne(ScoreVO vo);2. Mapper XML에 구문생성
	<update id="updateOne" parameterType="com.simple.command.ScoreVO">
		update score
		set name=#{name},
			kor=#{kor},
			eng=#{eng}
		where num=#{num}
	</update>
3. Class에서 호출 + 실행
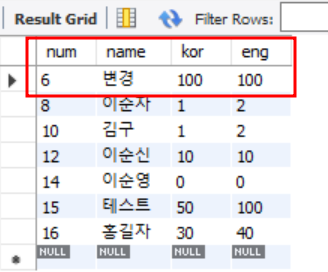
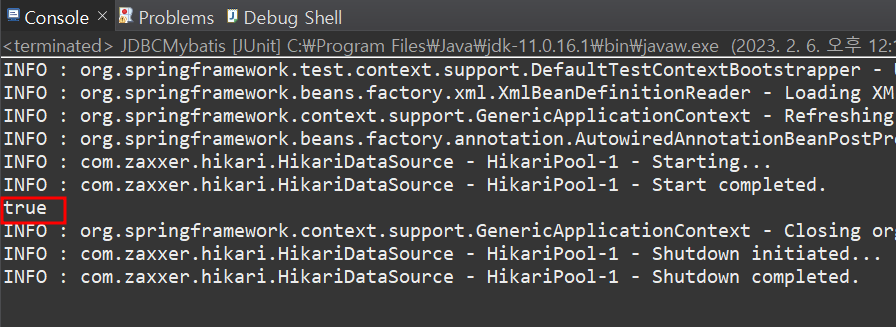
	@Test
	public void testCode10() {
		ScoreVO vo = new ScoreVO(6, "변경", "100", "100");
		boolean result = testMapper.updateOne(vo);
		System.out.println(result);	//성공시 true 실패시 false
	}
결과
'SPRING' 카테고리의 다른 글
| 92일차 Spring Mybatis 활용 (0) | 2023.02.06 |
|---|---|
| 92일차 Spring legact project 생성 순서 (0) | 2023.02.06 |
| 91일차 Spring DB 연동 (0) | 2023.02.03 |
| 90일차 Spring 스프링 MVC웹서비스 (0) | 2023.02.02 |
| 90일차 Spring MVC Controller객체 구현 (1) | 2023.02.02 |

댓글